Wednesday, December 30, 2009

Mom-Mom’s Pastry Cookies

Some things you want to make. Some things you have to make.

It is the kind of dough that mocks you from the dark depths of the fridge as you chill it. “I dare you.”

Well, it did that this year.

Every Christmas, my grandmother used to make what my mom called “The Hungarian Pastry Cookies.” We are not Hungarian. I’m not sure of the origin of this recipe, which at this point consists only of a list of ingredients, one noted direction and a temperature [but no baking time] I scrawled one year on a sheet of reporter’s notebook paper. I did learn this year that when my mother was a child, “Mom-Mom and Nanny [my great great aunt] used to spend a day together, making apricot filling, drinking the apricot brandy, rolling them in powdered sugar over and over again.”

Now, you all know I’m all for a sip or two of brandy anytime, but this is one baking project where a clear head is clearly needed.

I never saw my grandmother make them. I have no instructions, but I’m the only one in the family who knows how to make them. Or is willing to.

So I did again this year.

It is a tender pastry dough, not to be overworked, and quick to turn sticky once your rolling pin hits it. To be honest, though, I’ve never had a problem with it, not even the first year I attempted them. I did this year, though.

As I previously wrote, it was the final batch of dough made that Sunday night after the weekend snowstorm and a few days before Christmas. Perhaps it was the long days and late nights I’d put in, but once the dough came together in my mixing bowl and I went to pre-roll it into 16” x 16” x 1/8” sheets, it stuck to my fingers, it glued itself to the waxed paper, it melted and tore into holes in spots.

Back to the fridge to chill. Then it still didn’t behave. I had to call it a night eventually, but not until I showed the dough who’s boss.

It showed me instead.

All week, I silently checked it as it silently sneered back at me. For the first time, I was not looking forward to Christmas Eve Day, when I make the cookies to be delivered warm out of the oven that night, then still fresh for the extended family on Christmas Day. I could not not make them. That was not an option.

I held my breath that morning, banished all from the kitchen counter and went to work. Not “slowly but surely,” but quickly and efficiently. I gave the dough no excuse to gloop up on me. Using a ruler and a pizza wheel (or razor sharp knife), I cut each pre-rolled super-chilled sheet (my secret, shhhh) into sixteen 2” squares. You then put a dollop of filling in, fold over the edges, quickly evacuate them to a cookie sheet, then say a Hail Mary as you slip them into the oven.
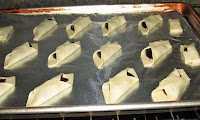
Fillings this year were prune (my favorite), apricot (family favorite & the tradition) and date. In years past, I’ve made a wonderful “stew” of dried figs and star anise. That was absolute blasphemy the first year I did it, as I’d forsaken the walnut filling my grandmother used to make. But everyone ate them then and in subsequent years.

Actually, I observed something this year that I’d seen in the past, but didn’t fully, duly or officially note.

Mom-Mom’s cookies are the first thing every member of my family takes when they arrive. My younger sister, who hosted Christmas this year, puts together quite a spread of appetizers and nibblies no matter what the occasion – pretty much anything and everything any guest could want. But my cousin Craig walked in after a long drive from Pennsylvania and took an apricot cookie – before barely a “Hello.” Ditto for cousin Alicia, even after assaying the table covered with cheeses, dips, crudité, chocolates, etc. My mother’s brother, Vic, makes no false pretenses or apologies: he pours a glass of milk and sits down right next to the cookies for as long a spell as it takes to relive childhood. My father made a beeline for the prune filled cookies. My mom, surprisingly, tried a date-filled cookie first.

“Delicious, good idea Elise,” she said. “But didn’t you make the fig this year?”

Wednesday, December 23, 2009

An Old Favorite for An Early Christmas

They say the holidays come earlier and earlier each year. We had our first Christmas of the season two days early, on Wednesday.

A special friend and I wanted our own Christmas to exchange gifts and had theoretically planned it pretty much since Halloween. I figured it would be a short quiet time together, maybe at home, over dinner in a restaurant, or at our favorite bar if need be. It’s not always easy for either of us to steal time away from home. But she is near and dear, as is every moment together.

In the end, she decided to make a full turkey dinner with trimmings and invite both me and my daughter over to celebrate with her family (my husband was working). Dessert? Quite a spread of cookies, courtesy of you know who.

I took such great pleasure in putting together these treats and chose a favorite green Depression glass dish to use. The flavors, the colors, the composition – I’m grinning ear to ear just thinking about it and the wide eyes that greeted the cookies once unveiled. She knows I like to bake and create and has tasted the fruits of my labor before, both savory and sweet. But never did she expect the variety or the surprise of one of her favorites: the tri-colored Italian cookies. They are my favorite cookie as well.

Served with a little Asti (one of her favorite drinks, another surprise I brought), the cookies were the perfect accompaniment nibble by nibble to our gift giving, creating one of the warmest, sweetest Christmases in recent memory.

This is the most wonderful time of the year.


7-Layer Italian Cookies
Gourmet Magazine, December 2005
4 large eggs, separated
1 cup sugar
1 (8-oz) can almond paste
2 1/2 sticks (1 1/4 cups) unsalted butter, softened
1 teaspoon almond extract
2 cups all-purpose flour
1/2 teaspoon salt
25 drops red food coloring
25 drops green food coloring
1 (12-oz) jar apricot preserves, heated and strained {you don’t need this much)
7 oz fine-quality bittersweet chocolate, chopped (best, darkest you can find; use extra if desired)

Put oven rack in middle position and preheat oven to 350°F. Butter a 13- by 9-inch baking pan and line bottom with wax paper, leaving a 2-inch overhang on 2 ends, then butter paper.
Beat whites in mixer fitted with whisk attachment at medium-high speed until they just hold stiff peaks. Add 1/4 cup sugar a little at a time, beating at high speed until whites hold stiff, slightly glossy peaks. Transfer to another bowl.

Switch to paddle attachment, then beat together almond paste and remaining 3/4 cup sugar until well blended, about 3 minutes. Add butter and beat until pale and fluffy, about 3 minutes. Add yolks and almond extract and beat until combined well, about 2 minutes. Reduce speed to low, then add flour and salt and mix until just combined. Fold half of egg white mixture into almond mixture to lighten, then fold in remaining whites gently but thoroughly.

Divide batter among 3 bowls. Stir red food coloring into one and green food coloring into another, leaving the third batch plain. Set white batter aside. Chill green batter, covered. Pour red batter into prepared pan and spread evenly with offset spatula (layer will be about 1/4 inch thick).
Bake red layer 8 to 10 minutes, until just set. (It is important to undercook.)

Using paper overhang, transfer layer to a rack to cool, about 15 minutes. Clean pan, then line with wax paper and butter paper in same manner as above. Bake white layer in prepared pan until just set. As white layer bakes, bring green batter to room temperature. Transfer white layer to a rack. Prepare pan as above, then bake green layer in same manner as before. Transfer to a rack to cool.

When all layers are cool, invert green onto a wax-paper-lined large baking sheet. Discard paper from layer and spread with half of preserves. Invert white on top of green layer, discarding paper. Spread with remaining preserves. Invert red layer on top of white layer and discard wax paper.

Cover with plastic wrap and weight with a large baking pan. Chill at least 8 hours.
Remove weight and plastic wrap. Bring layers to room temperature. Melt chocolate in a double boiler or a metal bowl set over a saucepan of barely simmering water, stirring until smooth. Remove from heat. Keep chocolate over water.

Trim edges of assembled layers with a long serrated knife. Quickly spread half of chocolate in a thin layer on top of cake. Chill, uncovered, until chocolate is firm, about 15 minutes. Cover with another sheet of wax paper and place another baking sheet on top, then invert cake onto sheet and remove paper. Quickly spread with remaining chocolate. Chill until firm, about 30 minutes.

Cut lengthwise into 4 strips. Cut strips crosswise into 3/4-inch-wide cookies.

Monday, December 21, 2009

Stained Glass Cookies

Let the games begin!

We’ve completely hunkered down in the trenches of Christmas cookie production. Starting Saturday afternoon as a snowstorm blew through the Northeast, my daughter and I made the following doughs:

- Sugar Cookies, to roll out and cut into shapes;
- French Chocolate rimmed in white non-pariels, a slice and bake variety;
- Pfefferneuse, to roll into balls and bake;
- Fig, raisin, bourbon and chocolate filling rolled into a spiral, to slice and bake (an invention this year of random ingredients);
- Gingerbread, to roll out and cut into shapes.

I added a sixth on Sunday night after putting my daughter to bed, when I made my grandmother’s tender pastry dough. These will be filled with apricot, prune and date fillings this year.

Do you think six varieties are enough? Is this a sufficient head start? There is a method to my madness.

Any doughs that can be refrigerated to make cut and slice, rolled and cut, or balled cookies are done first and set aside in the fridge for future use. This can be extremely convenient if done early enough, since you can bake a batch of each or any on short notice, or break off just what you’re yearning for when you simply want hot, fresh cookies at midnight with a glass of warm brandy. ‘Tis the season, you know.

In the coming days, I’ll tackle (with glee!) three-layer Italian cookies, a two-day process, almond macaroons (recipe here), dark chocolate-dipped icebox cookies dusted with pulverized peppermint sticks, and my own mixed-fruit biscotti.

By Sunday night, my first batch had already come out of the oven. Well, two actually, if you count the army of little gingerbread men I baked for good measure, and because my husband devours them.

I used my standard sugar cookie dough (recipe here) to create stained glass cookies – easy, glistening and impressive – for my daughter’s kindergarten class. The only extras you need are hard candies and nested cookie cutters.

I prefer individually wrapped Life Savers for this cookie. They come in a variety of colors, one candy perfectly fills the opening, and each comes in its own pouch. Crack and break them up with a hammer or mallet, being careful not to break the cellophane wrap. When you’re ready, just open the pouch and pour the candy into the cookie holes.

Roll the dough to at least a ¼ inch thickness. Cut your desired large shapes, place on a cookie sheet, then cut out your inner shape. Bake as directed. The crushed candies melt into “glass,” filling the inner shapes of the cookies. Ice or decorate as desired, or leave plain. Save the inner shapes to eat plain or decorate as one-bite treats. Accumulate and bake them on a separate pan, since they take a shorter time in the oven than the larger cookies.

I purchased one bag of mixed Life Savers and one bag of Butter Rum flavor. The mixed colors worked on the trees (green), snowflakes (white), some stars and angel “ornament” balls (red); the butter rums made for great gold stars and angels.

The little gift bags tied in a frizz of curling ribbon were a hit with the kids, since I also added the iced and sugared center shapes, some candy, and a gingerbread man to each.

Try these cookies this season, perfect your process, then make them on Valentine’s Day using heart cutters and red candies.


Let's just get past Christmas for now.